Showing posts with label recipe. Show all posts

Wednesday, August 24, 2011

Guest Post: henning love

Happy Wednesday! Today Meg from henning love is commandeering my blog for me. As some of you know, I recently had the pleasure of meeting Meg in person and I'm glad to have her as a blogger friend and real life friend too. It's all yours Meg!
***********
Hi everyone, I'm Meg of henning love and happy to help out Becca as she is starting graduate school this week. Good luck at school today Becca, and wishing you best of luck and I know you are looking cute with that school bag you posted recently.

Last week I was graciously blessed by some homemade veggies by my wonderful friend, Cat of 30+ means growing up or does it? She has a little backyard garden and she gave me a zucchini, some tomatoes, an eggplant and some squash. Of course I had to make some zucchini bread and I thought I would share with you all here the recipe I used with some photos. Let me preface this recipe with I love citrus zest in any dish, seriously my zester that I got from my wedding registry is my best friend in the kitchen. Ok on to the recipe :-)

First gather your ingredients. You need 3 eggs, 2 cups white sugar, 1 cup vegetable oil, 2 teaspoons vanilla extract, 2 cups grated zucchini, 1 cup chopped walnuts, 1 cup semisweet chocolate chips, 1 tablespoon orange zest, 3 cups all purpose flour, 1/4 teaspoon baking powder, 1 teaspoon baking soda, 1/2 teaspoon cinnamon, 1 teaspoon nutmeg. 

Preheat your oven to 350 degrees. Beat three eggs together in your mixer so they are light and fluffy. 

Then add the sugar, vegetable oil, vanilla extract, grated zucchini, walnuts, chocolate chips and orange zest. 


Mix these ingredients together well. Add the flour, baking soda, baking powder, cinnamon 
and nutmeg into your mixer.

 Combine the dry ingredients and wet ingredients together well. In your greased 9X5 bread loaf pan, pour in the batter, you will have enough batter for two loaves. Bake the bread for 50 minutes or until a toothpick inserted comes out clean. Then slice, eat and enjoy!
I was giving some away to my friend who gave me the zucchini so I decorated it cute to give it to her!

********
Thanks Meg! Those look sooooo good!! Chocolate? Sign me up! Anyone else want to go get some zucchini right now too?

Tuesday, August 23, 2011

Guest Post: The Chronicles of Ruthie Hart


Good morning all!! To get used to school for a few days I'm having 3 lovely ladies take over my blog. I'm super excited to have them help me out. Today Ruthie from The Chronicles of Ruthie Hart is baby sitting my blog for me. I really wish I lived closer to her so we could meet up. She's so fun and I hope you'll love her too! Take it away girl!
************

Hello A Blonde’s Logic readers! I am the  brunette behind The Chronicles of Ruthie Hart.


Yep that’s me. Ruthie Hart. I am a 20-something newlywed loving life in Austin, TX with my Ohio native hubby, Jon and our chunky French bulldog, Ernie.


So you are probably wondering what the heck summer beer is after reading the title of this post? Summer beer is the most potent and delicious summer drink you will ever throw back. I learned of this amazing concoction from one of my girlfriends and boy is it something. Summer beer is a mixture of lime-aide, beer and vodka (gasssp!). The pictures below were the product of too much summer beer…


WARNING: Disturbing picture below! We hosted a Wig Party for my hubby’s 28th birthday in April. After midnight, the party turned into a fake-mustache dance party. Confused? Check it out here. Ha!


Have I completely scared you?

Yay! You’re still here! For your drunken pleasure, I’ve posted the recipe below.

Ingredients
1 can frozen limeade
Vodka
3-4 beers

1. Pour the frozen limeade can into a pitcher (do not prepare according to the can)
2. Pour vodka into the empty limeade can and add to the pitcher
3. Stir in 3-4 beers of your choice
4. Enjoy!

I am NOT a beer girl at all (my mom says I will like it with age!) but I am a summer beer girl. You can’t taste the beer (or vodka) at all! Wait, maybe that’s why it is so potent!

I’d love for you to stop by my blog and check out some of my wedding related posts, delicious recipes and ramblings of my perfectly-imperfect life!

Xoxo,

Ruthie

*********
Thanks again for helping Ruthie!! I can't wait to try the recipe! Those pictures are priceless!!

Tuesday, August 16, 2011

Carmelized Peach Salad

I saw a picture of a new salad that California Pizza Kitchen had on their menu that looked tasty and pretty easy, so I figured I'd give it a try. Mine is a little different than theirs, I only looked at the picture, not the online description. But it served as a good inspiration!
CPK's Caramelized Peach Salad
The only thing that needs to be cooked are the peaches so I decided to grill them.
4 ripe peaches
1 1/4 teaspoon vanilla extract
1/4 cup brown sugar

Preheat grill to medium high heat. Cut peaches in half and remove the pit. Cut the halves in half and toss in a bowl with extract and brown sugar. Let sit for 15 minutes while grill heats up. Place them skin side down for about 3 minutes until the skin is slightly charred. Then turn the peaches and grill about 1 minute on the remaining sides until you get grill marks. Let them cool a few minutes before tossing them in the salad.

For the rest of the salad I used a head of romaine, chopped toasted walnuts, feta cheese, carrots, and cucumbers. When I added the peaches I also threw in a little champagne vinaigrette.
It was a big hit!! The caramelized peaches added some sweetness but it wasn't overly sweet. It was definitely an easy way to spruce up a salad.

Linked up with Tasty Tuesdays

Tuesday, August 2, 2011

Spaghetti Squash& Kale

I love spaghetti but sometimes I don't feel like eating all that wheat so spaghetti squash is a fabulous alternative to satisfy a pasta craving. You can cook it and add marina sauce and eat up but I like trying different things to make it more interesting.

This time I tried a recipe that included kale. It was pretty good and I think I'll make it again but change a few things.

1 spaghetti squash
1 bunch kale
1 ½ cups cooked chickpeas (or 1 can)
3 cloves garlic
olive oil
sea salt
pinch of crushed red pepper flakes
¾ cup toasted walnuts
fresh Parmesan  cheese

Directions:
1. Preheat oven to 400°F.
2. Cut spaghetti squash in half lengthwise, remove the seeds, rubbing the inside of each half with a drizzle of olive oil, then seasoning with salt and pepper. Place face down on a lined baking tray and cook for about 45 minutes.
3. While wash kale, cut away the rib, and roughly chop kale.
4. Heat oil in a large pan, then add minced garlic, crushed red pepper to taste, and a pinch of sea salt. Cook until fragrant, then add chopped kale and cook until the leaves are bright green and just starting to lose structure. Throw in the chickpeas and cook just to warm. Remove from heat.
5. After squash is done, remove from oven and let cool until you can handle it. Using a fork, scrape out the insides. Place all strands in a bowl, and toss with the kale and chickpea mixture.  Sprinkle with chopped toasted walnuts and shaved Parmesan. Enjoy.

I needed to add a little more salt and pepper once served, so be sure to season to taste. Next time I try this I think I'll add some lemon juice to freshen it up a little bit but overall it was pretty good.

Linked up with Tasty Tuesdays

Tuesday, July 26, 2011

Quinoa & Avocado Salad

I've been using avocados a lot lately because they just scream "summer" to me. So any excuse to use them I'll take it. Also I've been cooking with quinoa a lot because my mom is gluten intolerant. It is really tasty and has a good texture. If you haven't tried it yet then I highly recommend it.

One of my favorite quinoa dishes is a quinoa & avocado salad which I found the recipe for in Fine Cooking. It is really easy to make too. Just get organized before you start.

Ingredients:
3 Tbs raisins(pref a mix of dark&golden but it really doesn't matter I've used both)
2 Tbs dried apricots, thinly sliced
1 cup red or white quinoa(I've only used white)
salt
1 large lemon
3 Tbs extra-virgin olive oil
1/4 tsp. ground coriander
1/4 tsp. ground cumin
1/4 sweet paprika(I use regular paprika)
2 medium ripe avocados, cut into chunks
2 medium scallions, white and green parts, thinly sliced
2-3 Tbs chopped toasted almonds
ground pepper

In medium bowl, soak raisins and apricopts in hot water for 5 mins. Drain and set aside

In a 2-quart saucepan, bring 2 cups water, quinoa, and 1/2 tsp salt to boil over high heat. Cover, reduce heat to medium low, and simmer until water is absorbed and quinoa is translucent and tender(about 10-15 mins). Immediately fluff quinoa with a fork and let to cook to about room temp(you can turn it out onto a baking sheet for it to cool quicker).

Finely grate zest from lemon and squeese 1 Tbs juice. In small bowl whisk lemon juice, zest, olive oil, coriander, cumin, paprika, and 1/4 tsp salt. In large bowl, toss the vinaigrette with quinoa, raisins, apricots, avocado, scallions, and almonds. Season to taste with salt and pepper.

This is what it's supposed to look like, with the red quinoa.
Mine doesn't look quite as good but it tastes fabulous! I just need to learn to take pictures with a real camera besides my iPhone.

Linked up to Tasty Tuesdays

Tuesday, July 19, 2011

Grilled Scallop Salad


I'm not a seafood kind of girl. For example, California rolls are my "sushi" and it's usually not even really crab!! I'm trying to be but it's a slow process. Though, scallops I can tolerate. Maybe it's the meaty texture and doesn't taste like fish.

Since I'm taking a month off before school, I'm doing a lot of the cooking. So I decided to give scallops a try. I made a grilled scallop salad Sunday night and it was definitely a success! I got the recipe from Cooking Light and modified it a little. Makes 4 servings.

1/2 teaspoon black pepper, divided
3/8 teaspoon salt, divided
12 large sea scallops(about 1 1/2 lbs, I used more to make sure my boyfriend got enough to eat)
1 cucumber, halved lengthwise
cooking spray
2 tbs lime juice
2 tbs olive oil
4 cups romaine lettuce(I just cut up a whole heart)
3 cups of cubed watermelon
1/4 cups fresh mint leaves, chopped
1/2 peel avocado(I used a whole one)

Preheat grill to medium high heat
Sprinkle 1/4 tsp pepper and 1/4 teaspoon over scallops and cucumber. Arrange in single layer on grill coated with cooking spray. Grill 3 minutes each side or until scallops are done and cucumber is well marked. Remove from heat and cut cucumber into slices.
Combine remaining 1/8 teaspoon salt, juice, and oil into large bowl, whisk it. Then add cucumber, lettuce, watermelon, and mint. Toss to coat.
Divide watermelon mixture evenly onto 4 plates. Top servings with 3 scallops and 2 avocado slices. Sprinkle with rest of pepper.


If you follow the exact measurements it comes to 263 cals/serving.

I think I'll definitely make this salad again, even without the scallops!

**I added the avocado right into the watermelon mixture and tossed it. Then let people pick how many scallops they wanted since I made more**

Linked up: Tasty Tuesdays

Tuesday, July 12, 2011

Cake in a Cone!

For a friend's birthday on Sunday I wanted to do something special for her since I couldn't make it to her celebration during the day. So I got super creative and I'm so glad this worked out because it's so darn cute!

She loves Funfetti cake (who doesn't?) so instead of the traditional cake or cupcake I put them in ice cream cones.
What you'll need:
- cake mix of your choice
- icing of your choice(I used Funfetti)
 - cake ice cream cones(I only did 12) but do more if you want
 - aluminum trays that you won't mind cutting up. I bought 2 so I could have room for 12 cones and you'll want to used them as stands even after they are out of the oven.

Cut holes into the aluminum tray that are big enough for the cones to fit in but not so big that they fall through. This was one of the most time consuming part. Be careful because the cut aluminum is sharp and fold the raw edges over too!

Insert the cones in the upside down tray.


Prepare the cake batter as directed on the box or make your own.
Put enough cake mix into the cones but leave room for it to rise. I used as much as an ice cream scoop would hold.

Bake as directed on the box. It's okay if as it rises that it overflows a little.


Let them cool completely then ice them and decorate them as you wish.

Aren't the adorable?! I'm so proud of myself!

They were actually easier to eat than regular cupcakes too because you don't have to remove any wrappers without risking dropping the whole thing. 

I think these would be good for parties so you can walk around while eating unlike a normal cake where you have to juggle your plate, fork, and often beverage while eating.

Linked to Tasty Tuesdays

Tuesday, July 5, 2011

Watermelon Shark Attack

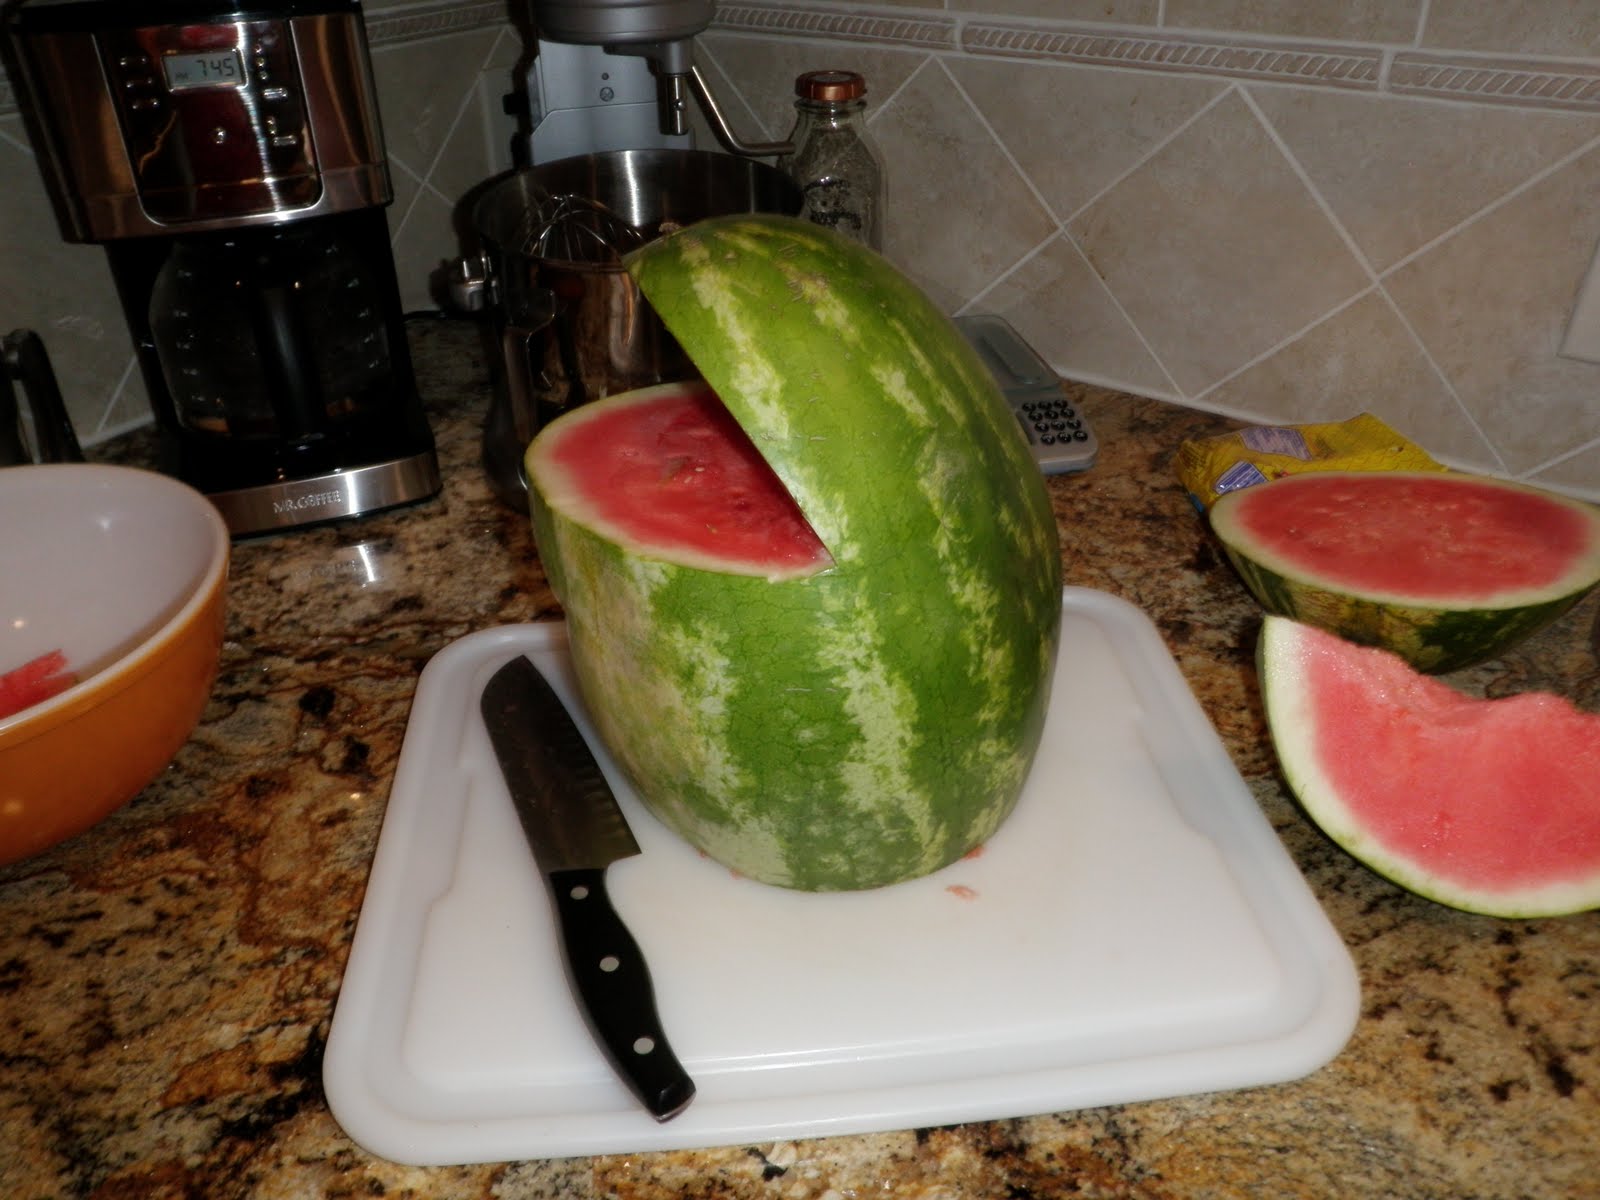
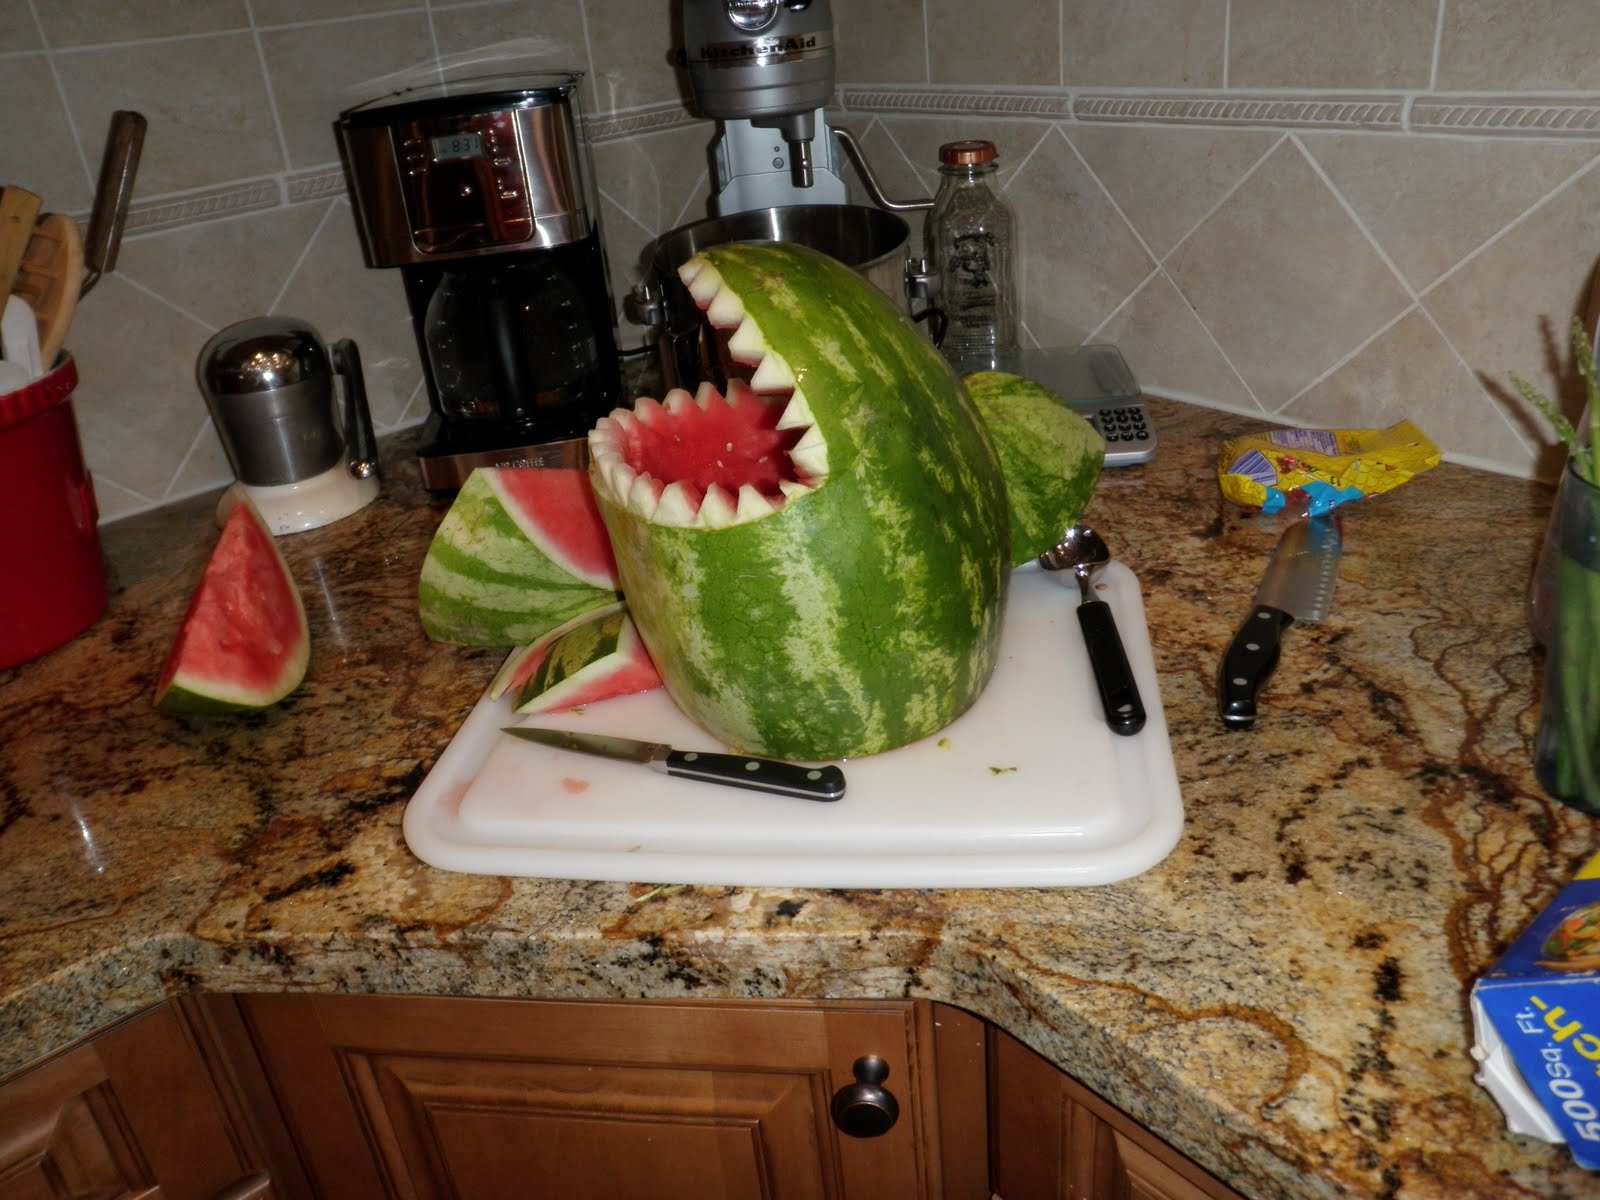
I have to say I'm pretty excited about my watermelon shark I made this 4th of July! And it was actually pretty easy too! Here was my version:
Totally cool right? And here is where I got my inspiration from :
You need:
1 big watermelon,
5-6 toothpicks
swedish fish
blue jello
2 grapes(for eyes)
1 Big sharp knife
1 smaller sharp knife

First start with a whole watermelon and cut 1/3 of it off at the end, on a diagonal. Save it for a fin later.
 With the watermelon standing up cut out a wedge for the mouth.
 Score about a inch around the soon to be mouth just to give some guidance(don't cut all the way through). Then using a small sharp knife, peel/cut off the green part in that 1 inch area.
 Then either using a melon baller, knife, spoon, or ice cream scoop(like me) take out all of the watermelon insides and set aside for later.

 With the empty watermelon, cut out little teeth using a shark knife.
 Then take the 1/3 of the watermelon that you cut off and shape a fin out of it. I did this by cutting the third in thirds, then shaping one of those pieces to make it a better fit. Then using 3-4 toothpicks insert them into the fin then push them all into the back of the shark.

When you're ready to serve put the shark on a dish or tray, fill the shark watermelon pieces from early back into it. Crave out spots for eye, inserting grapes and toothpicks to hold them in place. Also cut out gills too. For extra cuteness put blue jello around the shark with some Swedish fish candies.


At my family's fourth of July party the shark was a big hit. And now it seems like next year I'll have to do it again. I'm thinking a moose would be cool. It was pretty easy to do just make sure you wipe down everything after...it got sticky.

Anyone make something cool for the holiday weekend?

Linked up to Tasty Tuesdays

Tuesday, June 21, 2011

Organic Oatmeal Choco-chip Cookies


This recipe I got from a Pilates client at my work. One day she came in with these amazing ginormous oatmeal chocolate chip cookies, and low and behold they were also made with organic ingredients! **Gasp!** Organic desserts have come a long way lately and I'm so happy about that. These were even a hit with my boyfriend who usually doesn't like organic foods(or just pretends he doesn't).

So the client is not only stinking rich, has an amazing body, but she can also bake some bomb cookies...some girls have all the luck! Thankfully she shared the recipe with us so now I can pass them on to you. The ingredients don't HAVE to be organic so improvise if needed.

1 cup(2 sticks) unsalted softened butter(not melted)
2 eggs
1/2 cup organic sugar(cane sugar), I used Turbinado Raw Sugar
1 cup organic light brown sugar
1 1/2 tsp vanilla
1 1/2 tsp cinnamon
1 tsp baking soda
1/2 tsp salt

Blend above ingredients, then add:
1 cup whole wheat(organic) flour
1/2 cup white flour
3 1/4 cups whole organic oats(not instant)
1 cup milk chocolate chips(semi sweet works as well)

Bake at 350 degrees for 12-15 minutes depending on size of cookies on parchment paper covered sheets; I pulled them out at 14 but could have done it sooner. I used an ice cream scooper to measure them. Here are some of the tips that the client gave us: she tends to double the cookie size when scooping onto sheet and double the recipe. She slightly under bakes them so when the edges look done but center is still soft so they are moist and chewy. You can add nuts, shredded coconut or even chocolate drizzle on top before baking too.

Even though I didn't double the cookie size they perfect because portion control for me goes out the window with big cookies...I know my weaknesses.  Looking at the edges was a good tip because they are still moist in the center. Next time I might try oat flour for my mom who is gluten intolerant.

Linked up to: Tasty Tuesdays

Saturday, April 9, 2011

Oatmeal Scotchies!

On a cold, rainy night what's better than baking delicious cookies?! These cookies are definitely a go-to when it comes to baking and they are always satisfying...not to mention addicting! The sweetness of the butterscotch and texture of the oatmeal add to the appeal.


1 1/4 cups all purpose flour
1 tsp. baking soda
1/2 tsp. ground cinnamon
1/2 tsp. salt
1 cup(2 sticks) butter (softened)
3/4 cup granulated sugar
3/4 cup brown sugar(packed)
2 large eggs
1 tsp. vanilla extract(or orange zest)
3 cups quick or old-fashioned oats
1 2/3 cup(11 oz pkg.) Butterscotch chips (I use Nestle)

Preheat oven to 375 degrees

In small bowl, mix flour, baking soda, cinnamon, & salt

In large bowl, beat butter, both types of sugar, eggs, & vanilla. Then slowly beat in the dry flour mixture. 

Stir in oats and butterscotch chips. On ungreased, baking sheets drop tablespoon sized rounds. 
For chewy cookies, bake 7-8 minutes and for crispier cookies bake for 9-10 minutes. I enjoy them a little chewy. Let them cool for a couple minutes on the cookie sheets before transferring them.

And last but not least, EAT!!